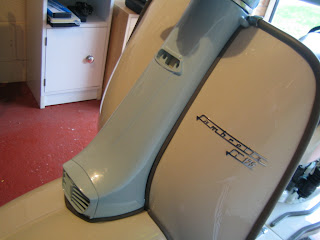
We are getting down to the last few bits now.
Tap out all the threads in the grille and casting to ensure they are free of paint.
Fasten on the grille to the horncasting and then place the lower rubber on top of the mudguard. Offer the horcasting up to the scooter inserting the TOP edge first. The, push in the bottom ensuring is fits snugly on the lover rubber beading. With it in place but not secured with bolts, place the side strip rubbers in to position.
It can be a bit fiddly, and it is worth stopping and checking when tightening everything up, that none of the beading rubbers have moved. I fasten the top two fittings first, using to bolts with 8mm heads and washers. Make sure you use the correct10mm length bolts as loger ones will break the casting lugs if you tighten them too much to get the fit right.
Next, I fasten the badge plate and casting to the steering bracket on the frame using the correct allen headed bolts as shown.
Here it is done. You can see the mouth of the clip, in to which the badge sits.
Here is the lug on the rear of the badge that goes in to the clip.
And fitted!
Now you can continue to add the fastening bolts but keep checking to make sure you have nice, tight fitting beading.
Don't forget the two 8mm headed bolts and washers that go under the mudguard in to the horncasting.
And finally, the bolts with slotted, bevel heads and cup washers to finish off the inside of the legshields neatly.
Horncasting is completed.


No comments:
Post a Comment
Please keep it friendly.