The lower shaft of the chrome ring is slightly tapered and is a very
tight fit in the frame. It must be knocked down in to the frame tube and
pretty decent weight is required to drive it down til seated correctly.
Use a block of wood but MAKE ABSOLUTELY SURE it is dead flat and does
not tilt to one side or the other whilst you are hitting it. Take your
time and be extremely careful not to damage the chrome ring. It WILL
break easily if you are not.
MAKE sure, when hitting the chrome ring down, that you have lined up the hole in the ring with the hole in the frame perfeclty. You cannot rotate it once it is knocked in.
Knock the ring all the way down until it is seated perfectly square to the frame tube.

and the hole in the chrome ring lines up with the hole in the front of the frame.

Insert the chrome ring grub screw

and tighten fully.

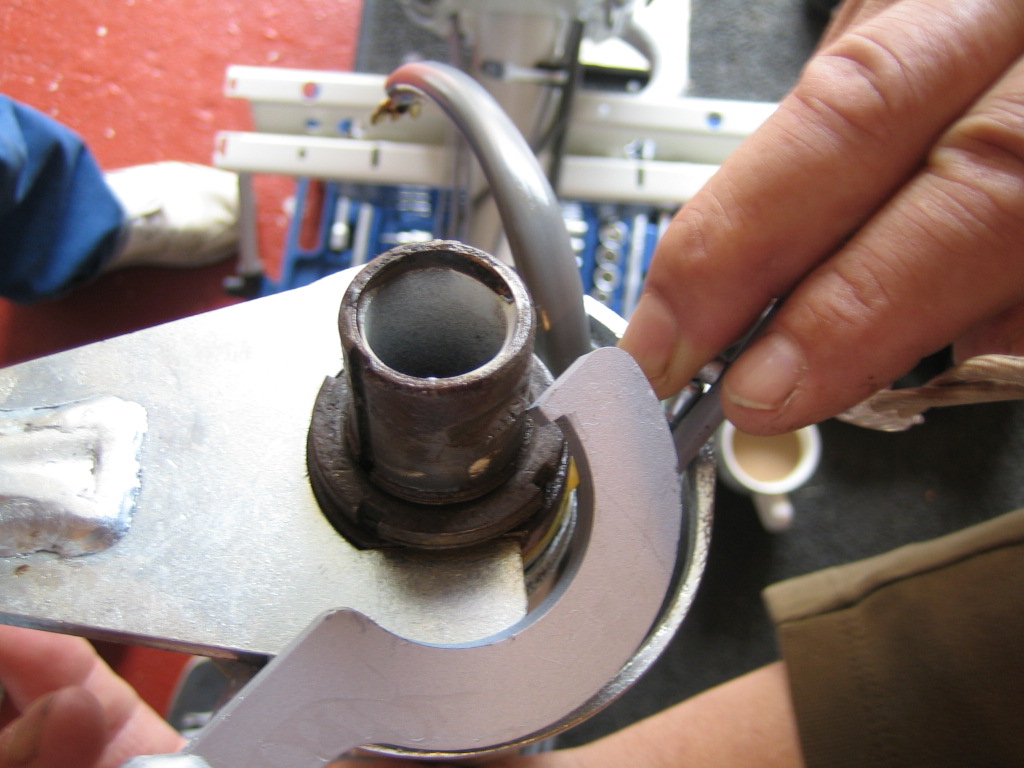
Look under the front of the fork tube and you will see the circular groove for the bearings at the bottom of your forks. This surface needs to be well greased.

Smear the grease around the whole area as shown.

Next, apply grease to the lower bearing race on your forks and slip on the lower bearings. Make sure your bearings are the right way up. Some have a flat plate on one side, which mu go downward so that the balls of the bearing are both rolling on the race of the fokrs AND the steering column. It's pretty obvious when you have them in front of you.

With help lifting the frame, insert the fork in to the frame from the bottom upwards. When they arrive at the top of the fork tube, grease the top bearing race, which is situated in the top of the 'chrome ring' and place on the top bearing. Grease the upper surface of the bearing as well.

If you can, get help to push the fork up the frame tube whilst you tighten the nut over the top bearings by hand. It is important that this nut is the right way around, it has a bearing race on one side. This goes downward. It is also crucial that you do not over tighten this nut.
Keep checking the forks can turn from side to side easily whilst you turn the nut carefully, using the correct spanner tool until any up and down play is gone and the forks cannot 'rock' in the tube.
Continue to check as you tighten that any play is gone but the forks still turn very easily. A good way to check is to line up the forks straight ahead and then give the frame a slap with your hand. The forks should fall to one side or the other.

When you are happy with your adjustment, slip over the tab washer. The tab fist in the the slotted groove on the forks.

Now put on the top locking nut.

Using the bottom bearing nut spanner, hold the bottom nut EXACTLY in place, whilst you tighten the upper locking nut with the correct tool.

Like this. When the top nut is tight, check the forks again to make sure nothing has changed in movement.

MAKE sure, when hitting the chrome ring down, that you have lined up the hole in the ring with the hole in the frame perfeclty. You cannot rotate it once it is knocked in.
Knock the ring all the way down until it is seated perfectly square to the frame tube.

and the hole in the chrome ring lines up with the hole in the front of the frame.

Insert the chrome ring grub screw

and tighten fully.

Look under the front of the fork tube and you will see the circular groove for the bearings at the bottom of your forks. This surface needs to be well greased.

Smear the grease around the whole area as shown.

Next, apply grease to the lower bearing race on your forks and slip on the lower bearings. Make sure your bearings are the right way up. Some have a flat plate on one side, which mu go downward so that the balls of the bearing are both rolling on the race of the fokrs AND the steering column. It's pretty obvious when you have them in front of you.

With help lifting the frame, insert the fork in to the frame from the bottom upwards. When they arrive at the top of the fork tube, grease the top bearing race, which is situated in the top of the 'chrome ring' and place on the top bearing. Grease the upper surface of the bearing as well.

If you can, get help to push the fork up the frame tube whilst you tighten the nut over the top bearings by hand. It is important that this nut is the right way around, it has a bearing race on one side. This goes downward. It is also crucial that you do not over tighten this nut.
Keep checking the forks can turn from side to side easily whilst you turn the nut carefully, using the correct spanner tool until any up and down play is gone and the forks cannot 'rock' in the tube.
Continue to check as you tighten that any play is gone but the forks still turn very easily. A good way to check is to line up the forks straight ahead and then give the frame a slap with your hand. The forks should fall to one side or the other.

When you are happy with your adjustment, slip over the tab washer. The tab fist in the the slotted groove on the forks.

Now put on the top locking nut.

Using the bottom bearing nut spanner, hold the bottom nut EXACTLY in place, whilst you tighten the upper locking nut with the correct tool.
Like this. When the top nut is tight, check the forks again to make sure nothing has changed in movement.

No comments:
Post a Comment
Please keep it friendly.