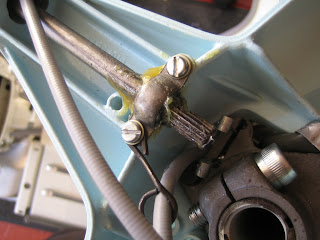
The function of the control rod cover bolts is to hold down the cover
AND the wire clip that will keep the cables from rubbing against the
rollers when the Lambretta is in use. First, open the wire clip and slip
it over the front brake cable, then close it and ensure it can fit
nicely as shown below.
Now, on the clutch control rod, you need to add grease to the hollow for the bush.
The nylon bush fits like this. With the flatter, washer type side facing the centre of the headset and the brass roller edge.
Put plenty of grease below the bush and around it.
It is held in place with two 10mm bolts that may be either hex type or slotted like ours through a top cover.
Place the cover over the bush and finger tighten the front bolt.
Now insert the rear bolt, washer and then wire clip and finally, tighten.
Make sure that your gear selector is pointing at neutral and ensure it stays there. You can use masking tape if you wish to help keep it in place.
Draw out the front (1st) gear cable inner and the rear (2, 3 4th gear) cable inner...
Insert the trunions in to the gear roller as shown...
Holding the cables in place with your fingers, push down the roller and on to the control rod. The inner cable trunions need to be top centre. Now using the correct bolt supplied with the rollers, push on the left handle bar inwards and make sure the roller is against the nylon bush and tighten the roller to the rod.
We can now adjust the gear selector on the engine...
Slip a rubber gaiter over the inner cable and push the inner cable back through the trunnion in the selector. This rear one selects FIRST GEAR when pulled forward.
Do the same with the near selector for 2, 3, 4th gear.
Pull on the inner cable and tighten the trunnion on both cables, all the while checking that the gear selector indicator on the handlebars is in neutral.
OBVIOUSLY, WHEN DOING THIS JOB, ENSURE THE ENGINE IS ACTUALLY IN NEUTRAL BY TURNING THE REAR WHEEL BY HAND.
There should be a little play in the cables but not much, we can make final adjustments when the scooter is running.
Slip a rubber gaiter over the clutch cable inner.
For this part, you really do need two pairs of hands. Get someone to pull on the inner cable, whilst pushing the clutch lever forward. I use the rubber handle of a hammer and wedge it against the rear damper. Push forward and tighten up the trunion.
Try the clutch lever and if it feel loose, mark the inner cable with a fet pen so you get an idea of how much more cable needs to be pulled through. Repeat until pulling in the clutch lever immediately starts to move the clutch arm on the engine.
Once the engine is running, we can again, make final adjustments. The best system is to pull in the clutch and move the engine in to first gear WITHOUT the engine running. Keep the clutch lever in and start to move the scooter forward, whilst slowy letting the clutch out. The bike should start to judder as the clutch tries to prevent the engine turning feely. This should happen just about as you have almost let the clutch out completely.
If you can adjust it so it works like this, the clutch adjustment is not far off and only minor alterations will need to be done with the engine running.
Now run some oil in the groove for the gear cables.
Grease and apply the bush for the throttle side control rod.
Place the inner throttle cable in to the slot as shown. You can see the throttle roller stop which fits against the headset bottom block just below it. Turn the control rod to line up the slot in it by turning the handlebar.
Push the roller on to the control rod, twist the grip as if you were accelerating and insert the bolt to tighten the roller to the control rod.
Check the clutch outer cable is held out of the way of the roller by the wire clip. Tighten up.
Apply grease to the control rod roller bushes...
...and spray white grease along the two headset cable to help reduce rubbing when the headset top is on.


No comments:
Post a Comment
Please keep it friendly.