Part of the rebuild for this scooter NOT following original factory
specification, has been the installation by Armandos Scooters of a 12v
system in the engine. Because of this, the way the scooter will be wired
has to change and new components not on the factory spec will be added.
This is a modern improvement that no restored scooter should really be
without, unless you want your machine to be totally factory spec. We
have added this upgrade to this machine to make it more user friendly
and reliable.
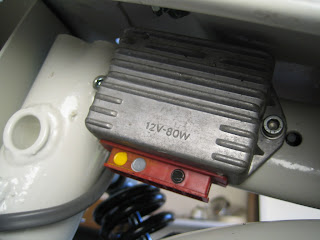
Below, you can see the grey metal regulator and CDI Unit. Both are Italian, quality parts.
Neither of these units were designed to go on this scooter when new, so there are no holes in the frame to mount them and new ones must be created.
Offer the regulator to the flywheel side of the frame just behind the upturned part of the main frame tube as shown.
Mark though both holes with a felt tipped pen and centre punch. You will have to drill out two holes in the rear frame tube that heads toward the back light housing. Drill out the hole to 5mm.
With the two holes drilled out, use and M6 tap to thread them and use two allen bolts with washers to attach the regulator to the frame where shown. Do NOT mount it too far back as it will be impossible to insert the wiring.
Mount the CDI Unit facing forward. Below, you can see where the original mounting position was prepared for the earth wire because the paint has been cleared from the area. The new holes are now obove and below the original one.
Again, drill and tap the holes. 5mm drill, M6 tap.
Test fit the bolts...
Clear paint away from the lower hole...
And mount the CDI as shown. Note that the yellow earth wire goes to the rear of the CDI and fixes to the lower bolt.
With both these components installed, we can leave the rear as I will
install a few last bits in the headset before doing the wiring in a
separate post.


No comments:
Post a Comment
Please keep it friendly.