Sunday, August 23, 2020

Adding the horncasting and grille

We are getting down to the last few bits now.


Tap out all the threads in the grille and casting to ensure they are free of paint.


Fasten on the grille to the horncasting and then place the lower rubber on top of the mudguard. Offer the horcasting up to the scooter inserting the TOP edge first. The, push in the bottom ensuring is fits snugly on the lover rubber beading. With it in place but not secured with bolts, place the side strip rubbers in to position.

It can be a bit fiddly, and it is worth stopping and checking when tightening everything up, that none of the beading rubbers have moved. I fasten the top two fittings first, using to bolts with 8mm heads and washers. Make sure you use the correct10mm length bolts as loger ones will break the casting lugs if you tighten them too much to get the fit right.


Next, I fasten the badge plate and casting to the steering bracket on the frame using the correct allen headed bolts as shown.


Here it is done. You can see the mouth of the clip, in to which the badge sits.


Here is the lug on the rear of the badge that goes in to the clip.


And fitted!


Now you can continue to add the fastening bolts but keep checking to make sure you have nice, tight fitting beading.


Don't forget the two 8mm headed bolts and washers that go under the mudguard in to the horncasting.


And finally, the bolts with slotted, bevel heads and cup washers to finish off the inside of the legshields neatly.


Horncasting is completed.


Adding lights switch & headset wiring & horn wiring

Here is our quality replacement light switch.


Along with the two screws to attach it to the handlebars.


The wires behind the switch need to be fed through the apperture in the housing, if you cannot get them to go, you will need to slacken off teh brake, undo the housing bolts and remove the throttle roller in order to pull away the housing a little to get all the wires through. Do NOT pull on the wires.

With the wires through, fasten the switch to the housing using the bolts in the kit.


The switch wiring is fed as shown in to the headset.


And secured under the alloy clip.


The two wires for the horn brach off and go down as shown in the picture below.


Feed them down behind the legshield bracket.


And insert in to the horn connectors. It doesn't matter which way round they go.


Now connect all the wires from your switch to the headset block floowing the wiring diagram posted earlier. Notice the loom wires are already in from a previous post.


Install steering lock

The steering lock is definitely one of those jobs that is best done on the bench whilst the headset is off the scooter. Adding it now is a little more tricky, but because we didn't have the parts at the appropriate time, we have no choice but to do it now.

The lock fits in the hole to the right of the green wire you can see in the pic below.


Here is the actual plunger, spring, grub screw and cap to fit the lock.


Make sure the hole for the punger as shown above is clear of paint and that the plunger actually goes up and down in it smoothly. Grease the plunger and spring and offer them in to the hole.


The plunger should drop in to the hole and spring back up because of resistance on the spring.

Below, it is fitted and a glob of grease is added to the upper surface of the plunger.


The lock itself can only be inserted one way and the giveaway is this hole drilled in to the body of it. This indicated the barrel of the lock which goes uppermost.


Turn the key, so that the lock is OFF. This is indicated by the rounded part of the lock arm being uppermost and adjascent to the hole in the barrel.

 The shot above, shows the lock in "locked" position. Turn it off to insert the barrel in to the hole in the headset.

Push the key and lock barrel in to the headset whilst pushing down the plunger with a screwdriver until the barrel will go no further. You may need to turn the barrel one way or the other until the hole in the barrel can be seen through the threaded hole for the grubscrew which holds the barrel in place.


When they do line up, insert and tighten the grub screw.

This simply stops the barrel rotating when you turn the key.


Check the lock to ensure it works properly by turning the steering to one side or the other and putting the key to ON position. The steering should be locked. Now push in the alloy protective dust cap over the plunger. Job done.


Adding seat

Here is our seat base back from being stripped of all the original paint and rust etc. It has been painted black, exactly as it should be. Alongside it are the rubber frame buffer and rear catch.


Original marking for "Giuliari" accross the centre cross member.


Don't forget to put back a new rubber buffer on the end of the seat catch push rod.


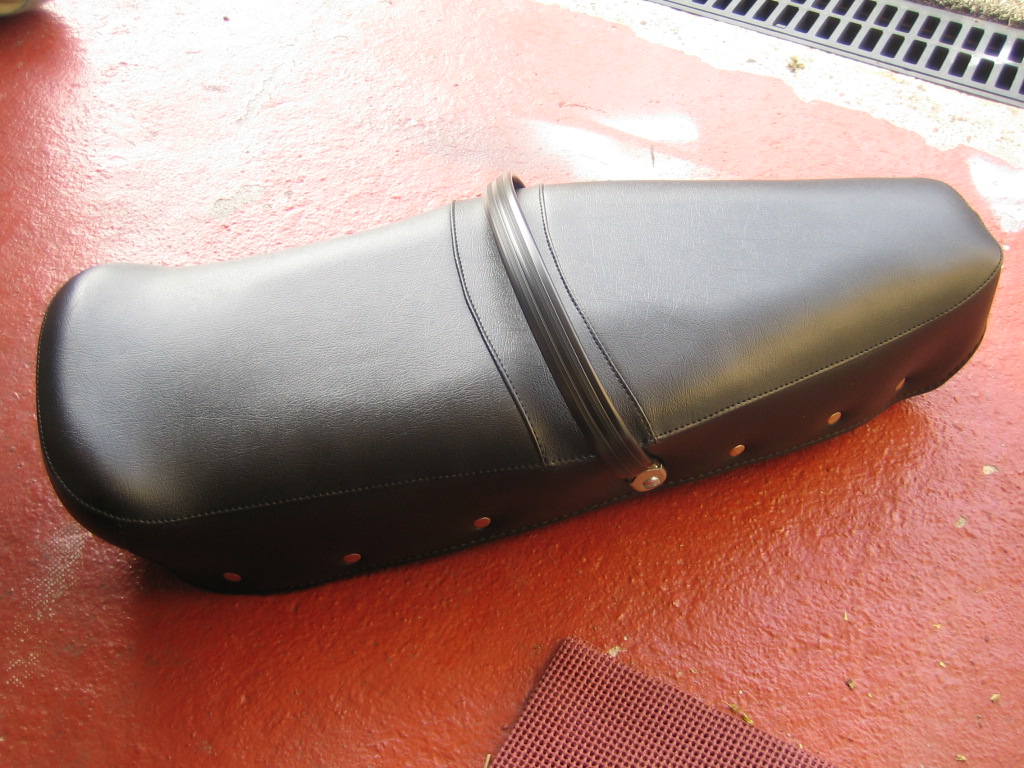
Here is our new seat cover as original spec.


Note the alloy tabs on the inside, which you will have to turn upright after the seat cover has been put on the base.


Insert the base in to the cover starting at the rear end first and then push in the front. It might be a bit of a stretch but with effort, it will go.

Then, start bending the cover tabs over the frame loop by first (with the seat upside down) pushing the top tab down and then the lower tab up and over it.

This prevents the alloy tabs from scratching or catching on your painted frame when the scooter is in use as it keeps the sharp edges away from the panelwork.


 With both tabs bent over, squash them flat using a hand clamp.


Work your way forward, both sides at the same time...


Until all the tabs are done.


 Your seat should now look like this.


Now, from the inside, push a sharp screwdriver or similar through the threaded hole where indicated to make a guide for the hole in the seat where the strap will be fitted. When you have done both sides, drill out the hole in the seat cover to 5mm.


You can now add the stap by insertign the strap end bolts through the cover and in to the threaded hole in the frame. It should then look like this:


And be dead centre in the seat pattern as shown below.


Now insert the rubber buffer block.


You might need to drop it in boiling water and use a bit of soap to get it to go in to the frame holes. It is VERY tight!


Here is the fixing kit for the seat. 13mm bolts and nuts, plus washers. Notice, the rear bracket for the catch has nylon washers.


Fit the front hinge by adding a thicker washer (shown below) under the hinge and a slimmer one under the nut, which goes inside the toolbox.


Put the thicker washers in place under the air scoop.


Offer up the hinge and push two of the bolts through. This is easily a two man job.

Fasten these two bolts loosely with a washer and nut on the underside of the frame in the toolbox. Then, slip in the front two thick washers and insert the front bolts and fasten. Don't fasten them all too tightly as we may need to adjust the position of the seat a little when fitting the rear catch.


It was at this point I realised we had picked up the wrong rear catch bracket. So for now, I'm using a sheet of bubble wrap to protect the frame and paint whilst the seat is down.


But it does look rather good with the seat added.


Here is the offending rear bracket. Notice the catch part is central on the bracket. Ours needs to be the type which is very similar, except with the catch to the left a little more. Oh well. I could always have the guys collect the scooter and add this themselves, it's such an easy job now to complete.

We ALL make mistakes.